
This blog post is a continuation from Preparing Your Data For AWS Sagemaker. This blog post assumes you have read that post. You can view the completed Jupyter Notebook in this gitlab repository.
Introduction
In the previous blog, Evan showed us how to prepare our data for training in AWS Sagemaker for XGBoost. In this blog I will show you how to train a model using this data and deploy an endpoint for us to run predictions against.
XGBoost Explained
Firstly I will give a broad overview of the XGBoost algorithm and why it was chosen for this particular problem.
XGBoost stands for eXtreme Gradient Boosting and it’s an open source library providing a high-performance implementation of gradient boosted decision trees. What this means is that it combines many models to create a final model, however with each new model being trained to correct the errors made by the previous ones. Your final model is created iteratively, each model having been created in succession.
The advantage of this iterative approach is that the new models are focused on correcting the mistakes which were caused by previous models. In a standard ensemble method where models are trained in isolation, all of the models might simply end up making the same mistakes!

XGBoost is a very popular algorithm in Kaggle competitions. The reasons for this is because some of the features it includes such as regularized boosting (which prevents overfitting), can handle missing values, parallel processing and can cross-validate at each iteration.
You can learn more about XGBoost here
So as you can see XGBoost is a very powerful and fully featured algorithm.
Training the model
With Sagemaker, you have the option to either create your own custom machine learning algorithms or use one of the several built-in machine learning algorithms. For this blog post we will simply use the built-in solution.
AWS SageMaker uses Docker containers for build and runtime tasks. AWS Sagemaker provides pre-built Docker images for its built-in algorithms and the supported deep learning frameworks used for training and inference. By using containers, you can train machine learning algorithms and deploy models quickly and reliably at any scale. In the case where you wish to use your own algorithm, you can use your own Docker images. You can learn more about that here
So first we pull the XGBoost image from AWS ECR (Elastic Container Registry)
from sagemaker.amazon.amazon_estimator import get_image_uri
container = get_image_uri(boto3.Session().region_name, 'xgboost')
Next we’ll specify the inputs for our model - the training set and the validation set that were created in the previous blog post.
s3_input_train = sagemaker.s3_input(s3_data='s3://{}/{}/train'.format(bucket, prefix), content_type='csv')
s3_input_validation = sagemaker.s3_input(s3_data='s3://{}/{}/validation/'.format(bucket, prefix), content_type='csv')
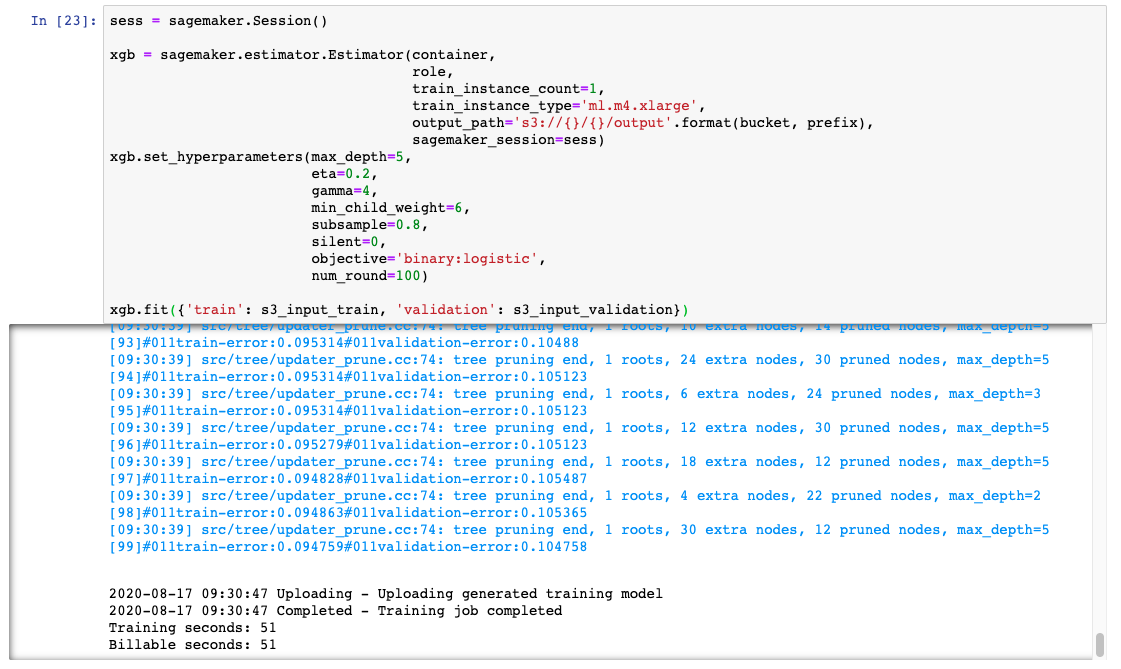
So up next is the creation of an ‘Estimator’. An Estimator is a high level interface for SageMaker training. Here we set the training algorithm container we want to use, an IAM role, the number of training instances and the type of instances, a path for output data as well as hyperparameters for our training algorithm.
sess = sagemaker.Session()

xgb = sagemaker.estimator.Estimator(container,
                                    role,
                                    train_instance_count=1,
                                    train_instance_type='ml.m4.xlarge',
                                    output_path='s3://{}/{}/output'.format(bucket, prefix),
                                    sagemaker_session=sess)
xgb.set_hyperparameters(max_depth=5,
                        eta=0.2,
                        gamma=4,
                        min_child_weight=6,
                        subsample=0.8,
                        silent=0,
                        objective='binary:logistic',
                        num_round=100)
The hyperparameters are as follows:
max_depth: Maximum depth of a tree.
eta: Also known as the learning rate. Adjusts weights on each step.
gamma: Minimum loss reduction required to make a further partition on a leaf node of the tree. The larger gamma is, the more conservative the algorithm will be.
min_child_weight: Minimum sum of instance weight needed in a child. Can help control overfitting.
subsample: Subsample ratio of the training instances.
silent: 0 means print running messages, 1 means silent mode.
objective: Specify the learning task and the corresponding learning objective. binary:logistic: logistic regression for binary classification, output probability
Feel free to experiment with the different hyperparameters to see how the results will change. You can find more info about them here
Finally, we can now pass our input data and begin creating the model. This is done with the fit function.
xgb.fit({'train': s3_input_train, 'validation': s3_input_validation})
Deploying the model
So we’ve managed to clean our data and then use that data to create a model which can then be used to make predictions. Amazing! But at the moment we aren’t making any predictions and if we wanted to, we don’t want to have to go into Sagemaker and boot up the notebook each time. And, eventually we will probably want to make the predictions available to a web application.
Sagemaker allows you to create an endpoint where you can pass data to it and get back results based on your model. To do this is actually very simple.
xgb_predictor = xgb.deploy(initial_instance_count=1, instance_type='ml.t2.medium')
Evaluating the Model
For this blog we are simply going to compare the predicted and the actual outputs from our model.
Our data is currently stored as NumPy arrays in memory of our notebook instance. To send in an HTTP POST request, we’ll serialize it as a CSV string and then decode the resulting CSV.
xgb_predictor.content_type = 'text/csv'
xgb_predictor.serializer = csv_serializer
Now we’ll create a function that will convert our test data into a format so that we can get predictions from our model endpoint. We’ll do this by using our test data and removing the target variable. Then we split our test data into batches and get the predictions for that batch. We’ll then collect all these predictions and convert them to a numpy array.
def predict(data, rows=500):
    split_array = np.array_split(data, int(data.shape[0] / float(rows) + 1))
    predictions = ''
    for array in split_array:
        predictions = ','.join([predictions, xgb_predictor.predict(array).decode('utf-8')])

    return np.fromstring(predictions[1:], sep=',')

predictions = predict(test_data.drop(['y_no', 'y_yes'], axis=1).to_numpy())
Now we can create a confusion matrix to compare the predicted values to the real values.
pd.crosstab(index=test_data['y_yes'], columns=np.round(predictions), rownames=['actuals'], colnames=['predictions'])
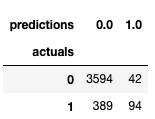
From our confusion matrix we can see that:
- We predicted 136 would subscribe, but only 94 of those actually did and 42 did not.
- We also had 389 subscribers who subscribed that we did not predict would.
This is less than desirable, but the model can be tuned to improve this. Try experimenting with the hyperparameters to see the changes and improvements that can be made.
Invoking outside of Sagemaker
Ok so we have our model deployed and we have evaluated it. Now what if we want to have it setup so that we can predict the output of new data through say a Web API? Well you can simply do that through AWS Lambda and API Gateway. For this blog I will not go into detail on how to setup the API but I will show how to invoke the model endpoint.
At Fathom we like to create our Lambda functions using NodeJS and so for this example that’s exactly what I will use.
First you will want to get the endpoint name for your model. You will find this in the Sagemaker dashboard in Inference/Endpoints. You can also create an endpoint with your own name if you wish, under Inference/Models. But since we have already created the endpoint in the Sagemaker notebook, we’ll just use that one for now.
Create a lambda function and make sure to add the following policy:
{
    "Version": "2012-10-17",
    "Statement": [
        {
            "Sid": "VisualEditor0",
            "Effect": "Allow",
            "Action": "sagemaker:InvokeEndpoint",
            "Resource": "*"
        }
    ]
}
This will allow us to invoke the endpoint. You should set up your policy to only provide access to the minimum rights it needs, however for this example we’ll just let it invoke any sagemaker endpoint for now.
Once the function has been created you can then copy the following code over:
const AWS = require('aws-sdk');
var sageMakerRuntime = new AWS.SageMakerRuntime({region: 'eu-west-1'});


exports.handler = async (event) => {
  var params = {
    Body: new Buffer('29,2,999,0,1,0,0,1,0,0,0,0,0,0,0,0,0,0,0,1,0,0,0,0,1,0,0,0,0,0,1,0,0,1,0,0,1,0,0,0,1,0,0,0,0,1,0,0,0,0,0,0,0,0,1,0,0,1,0'), // this is an example of the type of data that can be sent to the endpoint.
    EndpointName: 'paste-xgboost-endpoint-name',
    ContentType: 'text/csv'
  };

  const prediction = await sageMakerRuntime.invokeEndpoint(params).promise();
  const responseData = JSON.parse(Buffer.from(prediction.Body).toString('utf8'))

  return responseData;
};
I’ve hard coded the value here in the Body of the params for simplicity sake. But the data would probably come in from an api request. This is simply a csv string that correspond to the data found in our csv file that we used for our training data.
Save the function and create a test. It doesn’t matter what data is sent in as we have hard coded the values.
You should get a return result of: 0.0602235160768
This is just a simple example of how you can get AWS Lambda to interact with a Sagemaker Model Endpoint.
Cleanup
Important: Terminating resources that are not actively being used reduces costs and is a best practice. Not terminating your resources will result in a charge. You can simply run the following command to delete the endpoint that we just created.
sagemaker.Session().delete_endpoint(xgb_predictor.endpoint)
You may also want to delete or pause other resources that were created for this example.
- Sagemaker Notebook Instance
- S3 Bucket
- IAM Role
Conclusion
You have now learned how to train a model and deploy that model for production within sagemaker. As you have seen across these two blog posts, Sagemaker is a very powerful and flexible tool that allows you to build, train, and deploy your machine learning models with ease. You can view the completed Jupyter Notebook here.
References
- Tianqi Chen and Carlos Guestrin: XGBoost: A Scalable Tree Boosting System
- xgboost source code github repository